The Hydrangea Haven suite of products pair so well to create some very beautiful cards, scrapbook layouts, and decor items. My April class host wanted to use these products to make some interesting cards.
I started with a very simple card showcasing the Designer Series Paper (DSP). It did involve simple stamping and die cutting around the border of the image, but I invited the crafters to choose a coloring method they preferred while describing the uses of Stampin' Blends, Stampin' Blending Brushes, Stampin' Write markers, Watercolor Pencils and Blending Pens, sponge, and daubers. The background stamps were also available to create the coloring with stamps, which is what I used on the example.

Dimensions:
- 5 1/2" X 8 1/2" Highland Heather cardstock; score in landscape at 4 1/4"
- 5 1/4" X 4" White cardstock (for inside)
- 5 1/4" X 4" Gorgeous Grape Cardstock
- 5" X 3 3/4" DSP (this piece was cut at 1 3/4" from the bottom and a portion flipped over for the background)
- Scrap white cardstock to stamp the hydrangea flower and sentiment to fit the label die included with the set of dies
- Gorgeous Grape sheer ribbon, Old Olive ribbon (I used some retired ribbon I had), and rhinestones.
- I also die cut some of the small flowers out of Gorgeous Grape cardstock to add near the label.
You can watch the video to view a demonstration of this card with tips and helpful hints.
Another basic card was next to showcase the Hydrangea Hill Mercury Glass acetate and the Meadow Moments embossing folder as well as the Hydrangea Haven stamp set. I cased this card idea from Joyce McIntosh. This flower used mostly adding color with a blending brush, but you could use daubers, sponges, markers, watercolor pencils and a blender pen, or water coloring. There are also small flowers die cut from the designer series paper that were added over the head of the hydrangea.

- 4 1/4" X 11" White thick cardstock; score in landscape at 5 1/2"
- 5 3/8" X 4 1/8" Gorgeous Grape or Rococo Rose cardstock
- 5 1/4" X 4" White cardstock; emboss with the falling leaves folder (Meadow Moments) across the top portion of the cardstock in portrait
- 3/4" X 4" Hydrangea Hill Mercury Glass acetate (X 3--to coordinate with the cardstock layer)
- Scrap white cardstock to stamp, color and die cut the hydrangea flower
- Pastel Pearls
- Small petals die cut from the Hydrangea Hill designer series paper
Watch the video for the instructions and helpful hints and tips.
The technique card idea came from watching Lisa Cursio, a fellow US Independent Demonstrator, and I thought it was so creative. I did go and watch Sam Calcott's (UK) video as well. I used a water coloring technique also where the detailed image is embossed in white on the surface and then colored afterward.
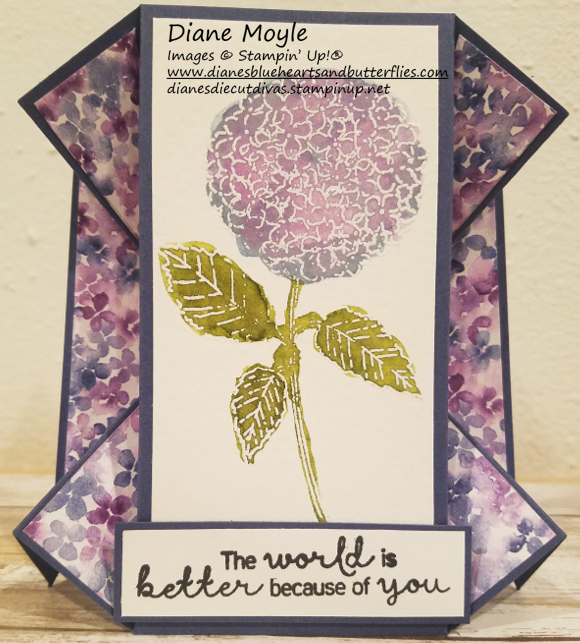
- 5 1/2" X 8 1/4" Misty Moonlight cardstock; score in landscape at 1 3/8", 2 3/4", 5 1/2" & 6 7/8"; then score diagonally from top to bottom between the left side and the 2nd score line and repeat between the right side and the previous score line
- 5" X 2 1/2" watercolor paper
- 5" X 2 1/2" white cardstock
- 5" X 2 1/4" Hydrangea Hill designer series paper (DSP) (X 2)
- 3 1/8" X 7/8" Misty Moonlight cardstock (for sentiment)
- 3" X 3/4" white cardstock (for sentiment)
Check out the video demonstrating how to make this card.
I really fell in love with this designer series paper and made another fun fold card highlighting the paper.

The circle on the right is like a catch for the flap opening to the left and then the half flap (showcasing the acetate) opens to the right and reveals the inside sentiment.
Thank you for visiting my page and I hope you enjoyed these projects and techniques.


