There are many times that we see products in catalogs and have a hard time seeing how they can be used with other unrelated (not in the same suite) products. We also may not connect other images as using a stamp set in a totally different way. This has been my experience many times.
I held my first make and take event and shared some different ways to use some of the products in the Stampin' Up! 2022-2023 Annual Catalog as well as spotlighting some retiring products that I really loved. There was also a really great technique that France Martin shared and has been used by so many others called peel away. I couldn't wait to show it to those in my local group and on the blog.
Two of the cards used the Wisteria Wishes stamp set and Wisteria dies (the bundle saves 10% off the individual product cost). The first is just stamps, ink, and paper.
- 4 ¼” X 11” color cardstock; score in landscape 5 ½”
- 4 1/8” X 5 3/8” Garden Green cardstock (X 2)
- 4” X 5 ¼” Basic White cardstock (X 2)
- Embellishments as desired
- Watch the video for instructions. I forgot to add the embellishments at the end of the video.
The second I found in the Catalog on page 167. I nearly missed it, and it shows a completely different way to use the products.
- 5 ½” X 8 ½” Crumb Cake cardstock; score in landscape at 4 ¼”
- 4” X 5 ¼” Crumb Cake cardstock
- 4” X 5 ¼” Basic White cardstock (inside)
- 2 3/8” X 3 7/8” Tahitian Tide/Balmy Blue Designer Series Paper (DSP)
- 2" X 5 ½” Basic White cardstock
- Scrap of Real Red cardstock to die cut label from Beautiful Shapes
- Scrap of Basic White cardstock to stamp and die cut 6 “trees”
- Sequins, rhinestones, etc.
- The video demonstrates how to create this card.
The New Horizons designer series paper, On the Horizon stamp set and Horizon dies are all retiring as of June 30, 2022. These lend themselves to so many scenic cards. When I saw France Martin's peel away cards I envisioned using these products to create some sympathy cards. I used some retired sentiments that I had on hand, and they were so serene.
- 5 ½” X 8 ½” Thick Basic White cardstock; score in landscape at 4 ¼”
- 5 1/8” X 3 7/8” background Designer Series Paper (DSP) OR Basic White cardstock that you create a background scenery or a row of flowers
- 5 ¼” X 4” Basic White cardstock
- See how to do this technique in the video.
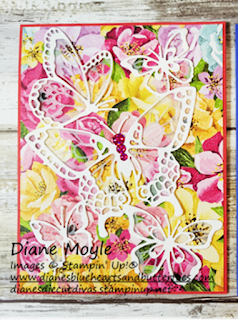
Another card was to highlight the new designer series paper "Hues of Happiness". I used some retired butterfly dies that I had on hand; however, I later noticed that it would have worked very well with the Brilliant Wings dies. You could use the framelits that cuts the group of butterflies out of vellum and then the detailed dies to cut from white to place over the vellum. I also used Adhesive Sheets for this card.
- 4 ¼” X 11” Coordinating Color cardstock; score in landscape at 5 ½”
- 4 1/8” X 5 3/8” Hue of Happiness Designer Series Paper (DSP)
- 4” X 5 ¼” Basic White cardstock with Adhesive Sheet backing to die cut detailed butterflies
- 4” X 5 ¼” Vellum cardstock to die cut background butterflies (Brilliant Butterflies)
- 4” X 5 ¼” Basic White cardstock (inside)
- Embellishments as desired (gems, jewels, thread, ribbon)
- The video shares tips and shows how to put things together. I forgot to add the embellishments while I was making the video, but remembered after I stopped recording.
Thank you for visiting my blog and letting me share what I love with you. I would love for you to check out my YouTube channel, like the videos, share them with friends, and subscribe. Also, click the bell icon to be notified when I upload new videos.
I'd love to hear from you and also go back to read comments. If you would like to purchase any products, please click on the Shop with Me button to select me as the Demonstrator for your order.


