In May we celebrate mother's, who give so much for their families. Many people say that you never really appreciate something until it's gone. I didn't understand how much I'd miss my mom until I wanted to give her a call to remember that I couldn't. I can still share these cards and sentiments with family and friends. The cards for my May stamp group may also be changed to fill other needs by changing the sentiments.
 This simple card uses labels cut with the Stitched so Sweetly dies, the swirl cut from the Parisian dies, Petal Pink organdy ribbon, Parisian Blossoms designer series paper, Petal Pink, Pool Party, and Whisper White cardstocks. I used thick Whisper White for the base cut at 4 1/4" x 11" (scored in landscape at 5 1/2"); Petal Pink cut at 4" x 5 1/4" (cut the second largest scalloped, stitched rectangle from the middle of this layer); designer series paper cut at 3 3/4" x 5"; then stitched labels from Pool Party and Whisper White (stamped with the mother's day sentiment from Tea Together stamp set). You would need 2 of the swirls cut from Champagne foil sheets. I placed the ribbon under the white label, and then used dimensionals under the Pool Party label.
 This card was made "casing the catalog". I used a Coastal Cabana base cut at 5 1/2" x 8 1/2"; Whisper White for the inside cut at 4" x 5 1/4"; Gold foil sheet cut at 3 3/8" x 4 3/8" and embossed using the Subtle embossing folder; watercolor paper cut with the 2 3/8" x 4" Stitched Rectangle die, Scalloped Lace trim (on my example I put this under the gold instead of between the watercolor and gold pieces, which I changed on the ones for my class); Whisper White circle cut with the 1 1/2" circle punch; and ribbon. I embossed the large rose from the Tea Together stamp set over the watercolor piece using Versa Mark ink and gold embossing powder, as well as the sentiment on the circle. You can see how I put this all together in my video.

Inside the card I stamped the cherry blossom branch from the Forever Blossoms stamp set in Pool Party toward the lower left corner and the sentiments in Memento Tuxedo Black. Check out my video.


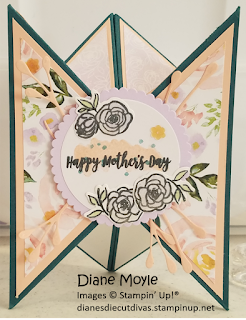
This is a special fold card that I saw on the internet and really wanted to learn how to make it. Sam Calcott from the UK designed this that she calls a tricorn card. The center on the back folds out to create a stand so it can be displayed, and yet folds flat to fit in an envelope. Her card was larger than the standard 4 1/4" x 5 1/2" card, so I resized the measurements she had to fit a regular sized envelope.
The base is an 8" x 5 1/2" piece of coordinating cardstock [to go with the designer series paper (DSP) you choose--I used papers from the Best Dressed DSP], and you will need 4 pieces of Whisper White cardstock cut at 1 3/4" x 5", 2 pieces of coordinating cardstock cut at 1 3/4" x 5", and 2 pieces of DSP cut at 1 1/2" x 4 3/8". You will also need labels and embellishments to decorate the front. I used the 3rd from largest scalloped circle and 4th from largest circle of the Layering Circles dies; "branch" from Cherry Blossom dies, flowers stamped and die cut using the Best Dressed bundle, and some sequins and Wink of Stella for bling.
The base is an 8" x 5 1/2" piece of coordinating cardstock [to go with the designer series paper (DSP) you choose--I used papers from the Best Dressed DSP], and you will need 4 pieces of Whisper White cardstock cut at 1 3/4" x 5", 2 pieces of coordinating cardstock cut at 1 3/4" x 5", and 2 pieces of DSP cut at 1 1/2" x 4 3/8". You will also need labels and embellishments to decorate the front. I used the 3rd from largest scalloped circle and 4th from largest circle of the Layering Circles dies; "branch" from Cherry Blossom dies, flowers stamped and die cut using the Best Dressed bundle, and some sequins and Wink of Stella for bling.
The scoring and cutting measurements are as follows:
- Base--score in landscape at 2" and 6", flip the cardstock over to the reverse side and score at 4". Flip back over and mark a point on the 2" and 6" scorelines at 2" from the top and bottom. Using a ruler and stylus score diagonally from the outer corners to the nearest marks, and then from the top and bottom of the 4" scoreline diagonally to the nearest marks.
- The 1 3/4" wide layers (white and coordinating cardstock)--mark along one long edge, from top and bottom, at 1 3/4"; and then cut diagonally from each mark to the opposite side outer corner at each end.
- The 1 1/2" wide DSP--mark along one long edge, from top and bottom, at 1 1/2"; and then cut diagonally from each mark to the opposite side outer corner at each end.
The scoring and folding of the base is hard to describe in writing, so please watch the video.
Thank you for looking at my projects.


